Configuring Treatment Pathways

Treatment Pathway Configuration in Administration may not be visible to you. Use of this area requires special training and certification from the Patient NOW Training Team. Contact your trainer for more information.
Please complete the steps outlined below before configuring the Treatment Pathway defaults and stages on the Administration | Communication Admin, Treatment Pathways tab.
Introduction
First, make sure to review An Introduction to Treatment Pathways and Best Practices for Treatment Pathway (Workflow) Design. These will help you understand more about workflow and process design.
Design your Treatment Pathways
Then, design your Treatment Pathways on paper before attacking the patientNOW configuration. Our Treatment Pathways Worksheet allows you to create an outline of each Treatment Pathway that includes:
- Stages attached to the Treatment Pathway
- Steps attached to the Treatment Stage
- Templates attached to each Treatment Step
- Assignment of Responsibility for each Treatment Step
Configure your Treatment Pathway Foundation
- Load all of the Templates necessary to complete Treatment Pathway Steps.
- Configure Treatment Pathway Steps
- Configuring Treatment Pathway Stages
- Configuring Appointment Types
Final Treatment Pathway Configuration
Navigate to Administration | Communication Admin, Treatment Pathways tab.
Click the Add button on the right to add a New Treatment Pathway or select an existing Pathway in the upper window; the system automatically saves any changes. You may not delete an existing Treatment Pathway, but if you check the Disabled box, it will not be available to be attached to a patient.
You may require that the user completes specific information when a Treatment Pathway is added to a patient (e.g. you have 2 coordinators). Check the box next to the item you wish to require. This was an option added in version 7.0.193 in the first quarter of 2020.
Assigned Treatment Stages
Start by adding the Treatment Stages you configured above, in the order that you defined on the Treatment Pathway Worksheet. Don't forget to add Appointment Cancel and No-Show stages at the end if you are using the automated functionality in your practice.
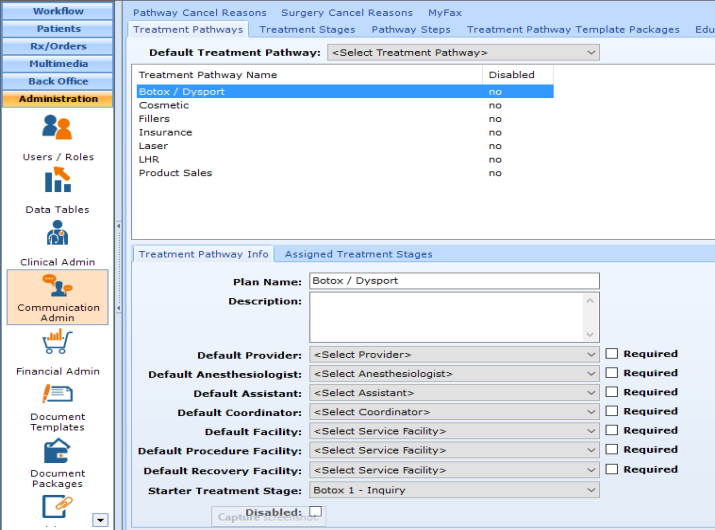
Treatment Pathway Info tab
Note: For all of the Default items below, if you do not select a person or place for the Treatment Pathway defaults, the user MUST select these individually each time a Treatment Pathway is started. This can also be important for reporting.
- Plan Name - This is the Treatment Pathway Name that shows in Patients | Patient Communications, Treatment Pathways tab and also pre-fills the Invoice Name on the Patients | Registration/Billing, Invoices Tab - Add Invoice dialog.
- Description - do Not Use
- Default Provider - very important, especially if you have Pathway Steps assigned to the Treatment Pathway Provider.
- Default Anesthesiologist - select the person/team that you normally work with; most important for surgery pathways. Ok to leave blank for non-surgical pathways.
- Default Assistant - select the person/team that you normally work with; most important for surgery pathways. Ok to leave blank for non-surgical pathways.
- Default Coordinator - VERY Important, expecially if you have Pathway Steps assigned to the Treatment Pathway Coordinator.
- Default Facility - Default Office Facility
- Default Procedure Facility - important for procedure pathways (e.g. Injectables and Laser) as well as surgical pathways
- Default Recovery Facility - select the facility that you normally work with; more important for surgery pathways. Ok to leave blank for non-surgical pathways.
- Starter Treatment Stage - select the first stage that will be assigned to the patient when this Treatment Pathway is added.